To create a Ticket Type follow the steps below:
1. Log in to your INTIX Account
AU - intix.com.au
NZ - intix.co.nz
UK - intix.co.uk
US - intix.com
2. Host An Event > Select Event > Tickets > Create Ticket

3. Enter the Name and Capacity, SAVE - this is your Ticket Type.
Note: The Ticket Type name is not visible on the ticketing page, it simply sets the capacity from which you can create price options.
To create headers that appear on the ticketing page, use Ticket Categories. Refer to this article.
Note: You are able to Add/Remove Units at anytime, refer to the instructions below - click here
4. Continue creating all required Ticket Types.
5. once all ticket types have been created, Select Cancel to exit and proceed to add pricing options.

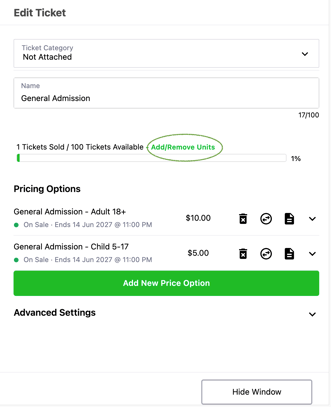
6. To add Pricing Options, select the three dots on the right of the Ticket Type, select EDIT

7. Enter price option title under Price Label.
Note: We recommend including the ticket type name and age (if relevant) for clear continuity ie. General Admission - Adult 18+
8. Enter Price
9. Here you can customise Available From and Available Until Dates and Times. Note: You can use pricing options to manage staggered ticket releases. Example: If you’re running a Presale and want a Second Release that draws from your Presale capacity (not the general onsale capacity):
-
Add a Second Release price option.
-
Set the first Presale price option’s Visibility to Hidden.
Your Second Release price option will now be available for purchase!
10. Select Visibility - Visible to the public or Hidden from the public
11. Select Show On Box Office - Visible for Box Office or Hidden from Box Office
12. SAVE

13. Select Add New Price Option to set up all remaining price options

14. Advanced Settings: Once all pricing options have been set up, here is where you can:
-
- Set a Minimum and Maximum ticket purchase per transaction - default is minimum, 1 and maximum 8
- Set a Scan Limit for your event
- Password Protect tickets - refer to this article: Password Protect Your Tickets
Add/Remove Units: Manage your capacity between ticket types easily by Add/Remove units.
- Select the three dots on the right of the Ticket Type, select EDIT
- Select Add/Remove Units
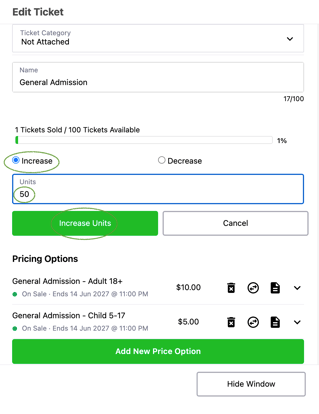
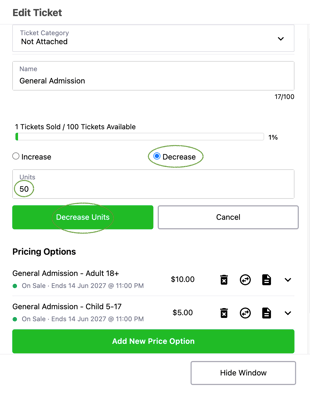
- Select Increase or Decrease
- Enter Units you want to increase or decrease by ie. if you have 100 units and want to make it 150, increase by 50.
- Select Hide Window to exit
Increase Units
Decrease Units
View your Ticket page while you are in draft mode by selecting View Ticket Page

TICKET page includes:
- Admission: set up single ticket types
- Group Tickets: create Family ticket or Group Tickets - refer to this article: Adding a Group Ticket to your Event
- Ticket Categories: giving you the ability to display your Ticket Types in a clear format on the ticket page - refer to this article:
- Add Ons - Sell merchandise or collect donations: refer to this article Add-Ons in Checkout
- Settings: here you can;
-
- Select Event Type - Ticketed Event or Registration Event
- Event Language
- Allow Ticket Forwarding
- Enable Ticket Upgrade
- Send Audience Marketing Email
- Set max Ticket Limit per transaction including processing large quantities of complimentary tickets
- Refer to this article: Ticket Settings in Event

Questions? Email your Account Executive or help@intix.com